In this tutorial, i will show you how to create Comment Section Design in Photoshop.
STEP01 - Create a new layer and select the Rounded Rectangle tool. Then make a perfect Rounded Rectangle. And set the radius to 8px. use Gradient tool for apply colours.
STEP02 - Go to Layer > Layer Style > Gradient Overlay and set these settings.
STEP03 - Create a new layer select pen tool. And then draw a shape like this.
STEP04 - Fill the shape with white color.
STEP05 - Select Gradient Overlay use these settings.
STEP06 - Create a new layer. Then make a perfect rectangle, by holding down shift when you draw out the box. Fill it with dark brown colour. And then select pen tool draw a shape like this.
STEP07 - Go to Layer > Layer Style > Gradient Overlay and set these settings.
STEP08 - Create New Layer and then select pen tool Create a shape like this. Fill it with a light yellow(EDE492) color.
STEP09 - Add New Layer, select Polygon tool Create a polygon with these settings. Fill it with a light yellow(EDE492) color.
STEP10 - Create New Layer. Select Rectangle tool Create vertical rectangle. Apply Gradient Overlay and set these settings.
STEP11 - Add a New Layer. Select pen tool Create a triangle like this. Fill it with a light yellow(EDE492) color.
Finally, Write your comments in the comment section and you’re done.
I hope it was helpful. I would like what you are done with this tutorial. Post your link below.
Apr 4, 2008
Create Comment Section
Apr 1, 2008
Create Glassy Button

This is the final result of what we will be creating. Come, lets go to create a photoshop Document 430x430 with a Black background.
STEP-01 Create a new layer name it “box”. Use the Rounded rectangle tool (U) create a rounded corner box. Press ctrl+enter make it a section and then fill in the selection with white colour.
STEP-02 Now you need to apply Blending Options: Gradient overlay, Inner glow and stroke styles to the box layer.
STEP-03 Apply Gradient Overlay Properties as given image above.
Add this colour code for gradient - left(B1DB08) center(66AB04) right(B1DB08).
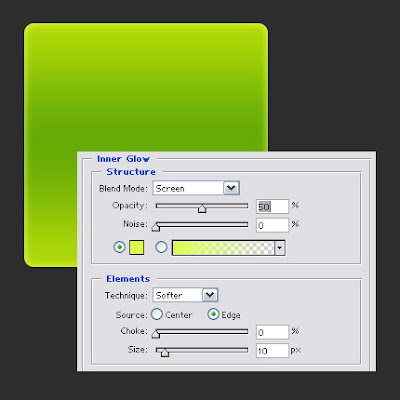
STEP-04 Next Add Inner Glow Properties as given image above. set the colour of glow(D9FF4E).
STEP-05 Add Stroke Properties as given image above. Apply the colour of Stroke(A8D508).
STEP-06 Create a new layer name it “light”. Make a Rounded rectangle selection again. Fill it with white colour.
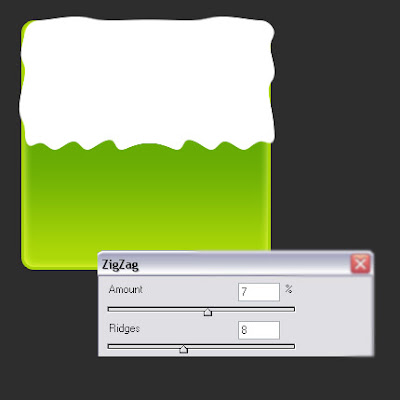
STEP-07 Apply zigzag filter (Filter > Distort > Zigzag). Follow the Properties as given image above.
STEP-08 Reduce the layer opacity 40%. Erace with eraser tool(E) rest of the light area. finally that brings us to the end of this Photoshop tutorial.
SAMPLES Here are Some Other Styles... Hope you will learn this tutorial easily. Thanks for Scrolling.